Where Captains meet Dock Owners
 Readme
Maritime and Coastguard Agency
Guidance
THE SHIP CAPTAIN'S MEDICAL GUIDE
Care of the Injured
Contents
- Cleanliness and sterilising
- General care of wounds
- Internal injuries
- Head injuries
- Eye injuries
- Ear injuries
- Nose injuries
- Mouth and dental injuries
- Burns and scalds
- Dislocations
- Sprains and strains
This chapter is about the care and treatment, after first-aid, of a casualty who has been moved to the ship's hospital or to his own cabin, ie. the definitive treatment of injuries sustained onboard.
Cleanliness and sterilising.
To prevent infection in wounds, burns and other conditions, all dressings and instruments should be sterile. Dressings should be supplied pre-packed and sterilised. There are two ways of obtaining sterile instruments:
- The instruments or equipment can be obtained in pre-packed sterilised containers. Such instruments are for once-only use and are disposable. Disposable equipment is very convenient to use.
- Instruments, which are not disposable, should be sterilised just before use in a steriliser or by boiling in water for not less than 10 minutes, then allowed to cool.
In using any instrument, the patient, or 'business', end of the instrument must not touch anything before use and only the operator should handle the operator parts of the instrument.
The attendant should similarly guard against infecting the wound:
- Sleeves should be rolled-up.
- Hands, wrists and forearms should be thoroughly washed, with soap and running water.
- Surgical latex (rubber) gloves should be worn to protect both the operator and the patient.
General Care of wounds
Classification of wounds
Wounds vary enormously in extent and depth, depending on how they are caused. They can be classified as follows:
- Abrasions (Grazes). These are often superficial and if thoroughly cleaned and appropriately dressed usually heal well.
- Incised wounds. These are caused by sharp implements, such as knives or glass, and may penetrate deeply to and through underlying structures, such as tendons, down to bone. The wound edges are generally healthy and heal well if the edges are carefully opposed.
- Lacerations. These are caused by blunt injury and involve crushing or tearing of the wound edge. This results in tissue damage or loss, and consequently carries an increased risk of infection.
- Puncture Wounds. These are not associated with great tissue damage or loss but carry a high risk of infection as organisms or foreign material (e.g. dirt or bits of clothing) may be driven deep into the wound.
- Bites - human or animal. These are often a combination of puncture and crush and carry an extremely high risk of infection, and will usually require antibiotics.
- Degloving Wounds. e.g. tissue being torn from a finger by a ring. These injuries involve loss of blood supply to the tissue and require specialist attention.

Wound Healing
There are many factors that can affect how well a wound heals.
| Factors that promote healing | Factors that impede healing |
|---|---|
| Clean incised wound | Ragged crushed wound edges |
| Fresh wound <6 hours old | Old wound >12 hours old |
| Uncontaminated | contaminated |
| No loss of tissue or blood supply | loss of tissue or blood supply |
| Scalp/face (good blood supply) | Shin (poor blood supply) |
Clean, incised, fresh wounds with no tissue loss and a good blood supply where the edges are held together will heal quickly and relatively painlessly. They will leave a minimal scar.
Wounds where there is a gap between the wound edges, either because of tissue loss or because it is not possible to close the wound completely will heal by growth of new tissue. This process is slow, often associated by some discharge and may be painful. The resultant scar may be unsightly or disabling.
Treatment of Wounds.
Before you start:
- Ensure the casualty is comfortable and is offered painkillers.
- A sterile haemostatic clamp (e.g. Spencer Wells forceps).
- A sterile pair of scissors and a scalpel/scalpel blade.
- A pair of sterile dissecting forceps.
- Sufficient sterile gauze swabs to clean and mop the wound.
- Sterile cleaning fluid, e.g. saline or antiseptic solution/wipes, in a suitable sterile container.
- Suture materials or steristrips as necessary.
- A disposable razor if necessary.
- A suitable dressing.
Check for damage to underlying structures. If a wound is on a limb it is essential to check that structures such as major blood vessels, nerves and tendons are intact. It will not be possible to repair them at this stage but such injuries should be documented and attended to at the next port. Injury to a major blood vessel is usually obvious because of bleeding. Apply firm pressure to the bleeding point and GET RADIO MEDICAL ADVICE. DO NOT USE A TOURNIQUET! An area of numbness beyond the injury may indicate nerve injury. Tendon injury will be indicated by inability to move a digit. e.g. extend a finger.
Wash your hands and prepare materials and equipment required to clean, close (stitch if necessary) and dress the wound.
Spread a sterile paper towel over a conveniently located table and lay out the following:
Ensure you have a container in which to place dirty or soiled dressings to hand.
Remember to wear surgical gloves to prevent (a) contamination of the wound and (b) exposure of yourself to the patient's blood.
Preparation of the wound prior to closure.
If the patient is able, get them to wash the wound and surrounding area under the tap. Use soap on undamaged skin. Next clean the wound then surrounding area thoroughly, with sterile saline or water. If the wound is heavily contaminated with foreign material (grease etc.) then an anti-septic solution, may be used. If necessary use local anaesthetic to infiltrate the wound (see below) prior to gentle scrubbing with a sterile nailbrush.
- Shave or clip the edges of the wound if necessary in order to see them clearly and to prevent hair being caught in the wound when it is closed. Do not shave eyebrows.
- Remove any particles of dirt (wood, metal etc.) with the tissue forceps.
- Trim away any ragged edges or dead tissue with scissors or a scalpel blade, using local anaesthetic if necessary
Local Anaesthetic
You should decide whether a local anaesthetic (L.A.) will be required. An L.A. should not be necessary for the insertion of 1 or 2 simple stitches; indeed the application of the anaesthetic may in such cases be more painful than the suturing. In more complicated cases it may be desirable to infiltrate lignocaine hydrochloride 1%. Occasionally L.A. is required in order to adequately clean a wound prior to closure.
Bleeding.
Exerting firm, sustained pressure to the wound, with a gauze swab, for five minutes or so may control bleeding. If there is pulsatile bleeding, that doesn't stop with pressure, it may be necessary to tie off a small bleeding vessel. If the bleeding vessel can be seen, grasp the end with the pointed tips of the Spencer Wells forceps and make sure the bleeding is controlled. Next take a length of cat-gut and, holding the forceps up, slip the ligature under the forceps and tie it off using a surgeon's knot (see Figure 4.4) so as to encircle the end of the vessel. Now cut the ligature ends short, leaving enough only to ensure that the knot doesn't slip. Then remove the forceps and inspect the wound to ensure the bleeding has ceased. WARNING! If the bleeding is torrential or welling up from deep within the wound, and the bleeding point cannot be identified do not grasp blindly with the forceps as you risk causing further damage. Apply prolonged, firm pressure. If the bleeding is still not controlled, GET RADIO MEDICAL ADVICE.

This lies on one side of,
and not over, the wound
Wound Closure.
The purpose of closing a wound is simply to oppose the edges so healing can take place quickly.
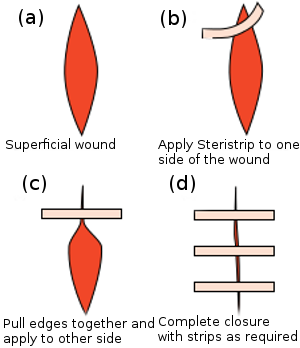
Using adhesive skin closures.
(Steristrips)
In the case of superficial lacerations or incised wounds, which nevertheless need closing, it may be possible to hold the edges together using steristrips. These are narrow adhesive strips. Once the wound is prepared for closure the steristrips should be applied as follows:
- Make sure the wound edges are dry or the steristrips will not stick.
- Stick the strip to the skin on one side of the wound up to, but not on the wound edge.
- Pull the strip across the wound so that the edges are brought together.
- Then stick the strip on the skin on the opposite side of the wound.
Repeat the process along the length of the wound until it is closed (Figure 4.1).

Using Sutures.
Deep and gaping wounds cannot be closed effectively using steristrips alone. For these wounds you will have to consider whether suturing is appropriate.
DO NOT suture if you cannot bring together not only the skin but also the deeper tissue. A 'dead space' will become infected, cause the wound to fall apart, delay recovery and may lead to the loss of the limb or even death (see Figure 4.2c). DO NOT SUTURE A WOUND THAT IS OVER 6 HOURS OLD. WHEN IN DOUBT DO NOT SUTURE.
The circumstances in which a suture should or should not be inserted are shown in Figure 4.2.
When you decide that suturing is appropriate, you will require the items listed above.
Sutures are supplied in sterile dry packs as a length of silk or nylon thread already attached to a surgical, curved, cutting needle. These should not be opened until all is ready for stitching to begin.
Then decide exactly what repair you intend to make. If the cut is linear, for example, how many stitches will you need? If the cut is star-shaped, will one stitch to include the apices of each skin flap be adequate?
Having decided upon the nature of the repair, open the sterile pack and extract the needle with the haemostatic or needle forceps. Hold the needle in the tips of the forceps approximately two- thirds the way down from its point.

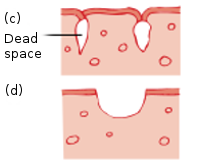
Wounds A and B can be stitched - Wounds C and D should not be stitched
Figure 4.2
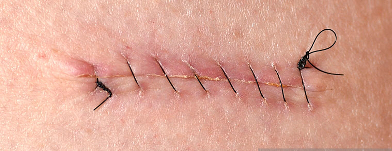
Grasp the edge of the wound furthest from you with the toothed forceps, then with a firm sharp stab drive the needle through the whole thickness of the skin at least 0.6 cm from its edge. Then grasp the skin on the immediate opposite side of the wound with the toothed forceps and drive the needle upwards through the whole thickness of the skin so that it emerges at least 0.6 cm from the wound edge (Figure 4.3). Make sure the depth of the suture is the same on both sides of the wound, or you will create a step on the surface . Now cut sufficient thread off the main length to tie a surgeon's knot with sufficient tension exerted (and no more) to bring the cut edges of the skin together. If the wound is deep and clean insert the needle deeply into the underlying tissue so as to draw it and the skin together. Insert further stitches as required at intervals of not less than 1 cm. After tying, cut off the ends of the knots, leaving about 1 cm of thread free to facilitate later removal of the stitches (Figure 4.3).

Figure 4.3 Stitching a wound.
If the cut edges of the skin tend to curve inwards into the wound, correct with toothed forceps (Figures 4.2, 4.3 and 4.5). As soon as the stitching is completed, clean the whole area with sterile saline, and apply a sterile occlusive dressing. Dispose of sharps safely.
Stitches should be inserted by using curved 'cutting needle' so that each completed stitch is 'round'.
Figure 4.5 Cross section of stitching a wound.
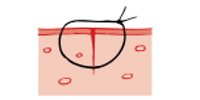
If you have a difficult, deep and tense wound to close use a mattress suture (Figure 4.6). A mattress suture ensures that you bring together the edges of the wound not just on the surface but throughout its depth and length.

Figure 4.6 A Mattress suture.
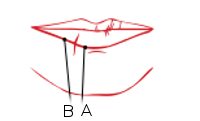
First stitch between A and B on the lip margin
Figure 4.7 Stitched lip.
Deep and gaping wounds that cannot be sutured (Figure 4.2(d))
If the wound is to be allowed to heal without suturing, lightly dress the wound with sterile paraffin gauze. Then place about three layers of sterile gauze over this and make fast with bandages. Re-dress the wound on alternate days until it is healed. If the wound is on a limb, it should be elevated to encourage draining and reduce swelling.

Wound Infection.
A greater or lesser degree of infection of the wound is inevitable after injury. This means that there will be a certain amount of fluid from the damaged and inflamed tissues, which should be allowed to escape. Remember this when inserting stitches; do not put them so close together that it is impossible for pus to discharge if it forms. Also, when inspecting a wound after stitching, look closely to see if there is swelling or tension on a stitch in any part of the wound, indicating the formation of pus within the wound. If there is, remove the stitch and allow free drainage of the wound.
Antibiotics?
Consider whether antibiotic therapy is necessary. Simple sutured wounds and superficial packed wounds should not require antibiotics. In other cases, and especially with deep wounds involving damage to muscles, start the antibiotic treatment. When in doubt, give antibiotics.
Tetanus.
Check whether the casualty has had a tetanus injection within the last 10 years. If not, give 0.5ml tetanus vaccine by intra-muscular injection. This injection should be noted in the casualty's records and you should also ensure that he understands that he has been given a tetanus injection.
Removal of stitches.
Once the wound has healed the stitches can be removed and a simple dressing worn until healing is complete. Remember that some wounds take longer to heal than others. Unless otherwise stated most sutures can be removed after one week.
The removal of stitches is a simple and painless operation if carried out gently. Clean the area with sterile saline. Grasp one of the ends of the stitch with sterile forceps and lift it up, so as to be able to insert the pointed blade of sterile scissors immediately under the knot. Cut the stitch level with the skin and by gently pulling with the forceps withdraw it (Figure 4.8).
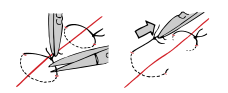
Figure 4.8 Removing a stitch.
| Site of Wound | Remove sutures after: |
|---|---|
| Face | 4–6 days |
| Scalp | 5–7 days |
| Upper limbs | 7 days |
| Lower limbs | 8–10 days |
| Back | 10–12 days |
| Over a joint (e.g. elbow, knee) | 12–14 days |

Internal injuries
The site of each major internal organ is shown in Annex II. If you suspect any organ is damaged, always start a 10 minute pulse chart so that internal bleeding can be recognised as soon as possible by a rising pulse rate. If the pulse rate is or becomes high (>100 beats per minute) GET RADIO MEDICAL ADVICE
Restlessness is often a sign of internal bleeding – so all patients who are restless after injury need careful watching.
If the patient is restless because of great pain, and other injuries permit (not head or chest injuries), give morphine. This will control the pain, help to keep the patient calm and quiet, and thus diminish bleeding by rest.
Injury to the abdomen with protrusion of gut.
GET RADIO MEDICAL ADVICE. This injury requires hospital treatment ashore at the earliest moment. Until then, put the patient to bed lying on his back with his knees drawn up to relax the abdomen. No attempt should be made to push intestines back into the abdomen. Exposed intestines (gut) should be covered with a clean, non-fluffy very damp bed sheet. The covering should be kept damp with cooled boiled water and should be held on loosely by a binder. Alternatively the intestines could be loosely wrapped in cling-film. Nothing should be given by mouth. If the patient cannot be taken off the ship within about 12 hours, fluid should be given via the rectal route.
Keep the patient warm, give morphine to keep the patient pain-free at rest and start antibiotics until he can be taken off the ship.
Head injuries
The majority of head injuries are not serious. However, all but the most superficial head injuries are potentially dangerous. Careful examination is therefore essential.
In the first instance, the aim of examination is to distinguish whether the patient has sustained, or is at risk of, a brain injury.
The characteristic sign of brain injury is alteration in the level of consciousness.
Assessment of the Head Injured Patient
History
If the patient is conscious they are usually able to tell you what happened. For patients who are unconscious it is essential to get as much detail of what happened from other crew members, particularly whether the patient's level of consciousness has changed since the injury occurred.
Examination
There are three key indicators of brain injury.
- Level of consciousness,
- pupil size and reaction to light, and
- signs of paralysis down one side of the body.
Level of consciousness (L.O.C.)
After ensuring that the casualty's airway is clear and he is breathing adequately, your first priority is to establish the patient's L.O.C. This can be done simply and quickly using the A.V.P.U. score, detailed below, or the Glasgow Coma Scale (GCS) if you are familiar with it.
| 1. Is the patient | Alert (talking sensibly etc.)? |
| 2. If not does he respond to | Verbal stimuli (i.e. your voice)? |
| 3. If not does he respond to | Pain (e.g. Firm pressure on a fingernail with a pen)? |
| 4. Or is the patient | Unresponsive? |
This is the most important indication of brain injury, and if the patient's L.O.C. is deteriorating, following a head injury GET RADIO MEDICAL ADVICE, YOUR PATIENT REQUIRES URGENT TRANSFER TO HOSPITAL.
Pupil Response
- Are the pupils equal in size?
- Do they constrict (get smaller) when a light is shone into them?
The pupils should be the same size and constrict quickly and equally when a bright light is shone into them. Some people always have unequal pupils, however, in an unconscious patient, following a significant head injury, a pupil that is widely dilated and unreactive to light probably indicates a serious, life threatening brain injury. GET RADIO MEDICAL ADVICE YOUR PATIENT REQUIRES URGENT TRANSFER TO HOSPITAL.
Signs of Paralysis down one side of the body
Is the patient moving one side of his body more than the other? You may have to inflict a painful stimulus, like pressure on a fingernail, to get an unconscious patient to move. Unilateral paralysis may indicate that a blood clot is forming in the skull and putting pressure on the brain (Figure 4.9a). Under these circumstances, GET RADIO MEDICAL ADVICE YOUR PATIENT REQUIRES URGENT TRANSFER TO HOSPITAL.
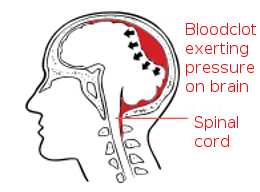
Figure 4.9a Compression of the brain.
Care of the Unconscious Head Injured Patient
It is essential that you do not allow the patient to come to any further harm.
Move the patient to a safe environment, place him in the recovery position and ensure that his airway is clear and he is breathing adequately. If necessary, assisted respiration or artificial respiration should be given. He must be kept constantly under observation in case he should vomit, have fits or become restless and throw himself out of the unconscious position. The observation should be maintained when consciousness returns in case he lapses into coma once again.
Caution! Injuries to the neck are often associated with severe head injuries, so every care should be taken to minimise movement of the neck, and a neck collar, if available, should be fitted to the patient.
Once the patient is in a safe environment, GET RADIO MEDICAL ADVICE and continue to monitor the patients breathing pulse and level of consciousness.

Other Signs of Serious Head Injury
Skull Fractures
A skull fracture indicates that the patient has sustained a significant head injury. In severe injury a depressed fracture may be apparent on careful examination. There is a depression in the skull and sometimes, bony fragments may be present in the wound (Figure 4.9b). Linear fractures of the sides or top of the skull (the vault) are less obvious and normally only diagnosed on x-rays. However, they are occasionally seen or felt at the base of a head wound. Base of skull fractures are the result of indirect force which is transmitted to the base of the skull from a heavy blow to the vault, from blows to the face or jaw or when the casualty falls from a height and lands on his feet. They can be diagnosed by deduction from the history of injury and certain examination findings.
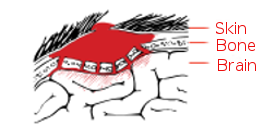
Figure 4.9b Depressed skull fracture with brain compression
- CSF (cerebro-spinal fluid) leakage from the ears or nose. This fluid normally circulates around the brain and spinal cord, cushioning them from injury. It appears as bloodstained or sticky clear fluid that trickles from the ear or drips from the nose.
- 'Panda Eyes' Bleeding from a base of skull fracture ends up appearing around both eyes giving the patient two black eyes.
There is little you can do about the skull fracture itself. If you suspect a depressed fracture, suturing any laceration should control bleeding.
An open wound needs to be covered to prevent infection. However DO NOT poke around in scalp wounds, press over the wound, or try to remove fragments of bone from scalp wounds.
Using scissors, trim the hair around the wound then shave the scalp with a disposable razor so that the edges of the wound can be seen clearly. Carefully clean the wound and surrounding scalp by irrigating the area with sterile saline or boiled, cooled water. Dry the scalp then suture the laceration with silk, and cover this with sterile swabs before bandaging. Hair should not be allowed to enter the wound. Give benzyl penicillin 600 mg intramuscularly, followed by oral antibiotic treatment. If the casualty is unconscious, continue to give benzyl penicillin 600 mg intramuscularly every 6 hours. If allergy develops read the section on allergy and GET RADIO MEDICAL ADVICE.
Fits or Convulsions
Fits may occur after a head injury. If the movements are violent, do not attempt to restrain the casualty by the use of excessive force. It is only necessary to prevent him from causing further injury to himself. If the fit continues for more than a minute give diazepam 5mg rectally. If this dose fails to control the fit, give a further 5mg after 3–4 minutes and GET RADIO MEDICAL ADVICE YOUR PATIENT REQUIRES URGENT TRANSFER TO HOSPITAL.
Headaches
Headaches are common after all types of head injury, even when trivial. However, they usually subside over the days following the injury. A headache becomes concerning if it increases in severity and particularly if it is associated with the onset of drowsiness, confusion or vomiting. Under these circumstances GET RADIO MEDICAL ADVICE.
Vomiting
One or two episodes of vomiting following a head injury is relatively common and not cause for concern. Persistent 'effortless' vomiting, however, may be an indication of increasing pressure within the skull caused by an enlarging blood clot. When associated with increasing headache, drowsiness or confusion, this should be taken seriously and you should GET RADIO MEDICAL ADVICE.

Communication
When communicating with a medical advisor on the ship's radio it is essential that clear, concise information is conveyed. You should report using the format in including particularly:
- A report of the patient's ABC status. A=Airway Is the patient maintaining a clear airway (Noisy breathing indicates a partially obstructed airway.) A clear airway should be maintained at all times. B=Breathing Is the casualty breathing adequately? What is the respiratory rate (breaths per minute)? C=Circulation What is the pulse rate? Is the pulse full or thready?
- A report of the patient’s level of consciousness (A.V.P.U), pupils size and reaction, and signs of paralysis. This should include any change since the injury occurred.
- Details of any other injuries.
Longer term management of serious head injuries.
If a casualty with a serious head injury has to remain on board for more than a few hours, it will be necessary to monitor his condition. You should record as much information as possible to help those to whom the casualty will eventually be transferred and possibly deal with certain complications.
Include in your records:
- Date and time of the accident.
- How the accident happened in detail.
- The casualty's condition when first seen.
- The condition of the casualty subsequently.
- Details of the treatment you have carried out.
- The respiratory rate. A clear airway should be maintained at all times. If the respiratory rate drops below 8 breaths per minute assisted or artificial ventilation should be used.
- The pulse rate.
- The level of consciousness. (A.V.P.U.)
- The state of the pupils. (Size and reaction to light)
- The development of any signs of paralysis.
The essential observations should be recorded every half-hour while you are preparing to evacuate the casualty. They are, in the order of importance:
Concussion and Minor Head injuries
Concussion
Concussion of the brain can occur when a heavy blow is applied to the skull. It occurs because the brain is fairly soft and its function can be subject to widespread disturbance when shock waves pass through its substance. Suspect this condition if the casualty loses consciousness for only a few minutes. It is characterised by a loss of memory for events before or after the injury, headache and sometimes nausea and vomiting. The casualty should be put to bed and allowed to rest for 48 hours. Headache may be troublesome and paracetamol or codeine phosphate may be required. These headaches may continue for many weeks after an accident. The casualty should be warned to report immediately if he notices increasing headaches or drowsiness or if he vomits. He should be sent to see a doctor at the next port.

Bruising
Bruising will occur if a moderate force is applied. Because the head is well supplied with blood, a collection of blood (haematoma) will form in the tissues under the scalp. It may be sharply defined, hard and tense, or it may be a fairly diffuse soggy swelling (Figure 4.10). If the soggy area is large it may indicate an underlying fracture so the patient should be closely monitored. No specific treatment is required. An ice pack held over the area might control the bleeding.

Figure 4.10 Bruising of the head.
Scalp Lacerations
These are common because there is little tissue between the skull and the scalp. The wound will bleed freely and often out of proportion to the size of the wound. Surrounding tissues may be swollen and soggy with the blood that has leaked into them. The scalp edges will be ragged, not clean-cut (Figure 4.11). Control the bleeding by pressure. If necessary, stitch the wound as detailed above. Ensure that you can see the wound clearly by shaving the scalp for distance of 1cm from the wound edge.

Figure 4.11 Scalp wound.
Pain Relief in Head Injuries
Paracetamol should be used in minor injuries for relief of headaches. 1g orally every 4–6 hours (maximum 4g per 24 hours)
Codeine phosphate may be used if Paracetamol is not effective. 30–60mg orally or intramuscularly every 4–6 hours.
Morphine should not be given unless the head injury is trivial and the casualty has serious and painful major injuries elsewhere.

Eye injuries
The eye(s) can be injured in several ways which include foreign bodies, direct blow as in a fight, lacerations, chemicals and burns. The eye is a very sensitive organ and any injury must be treated seriously.
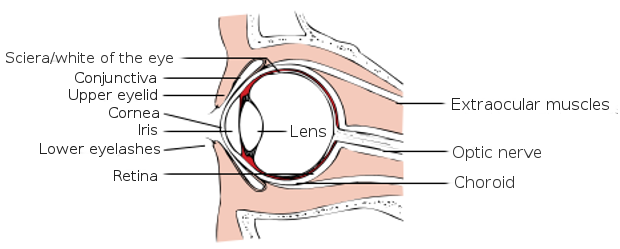
Figure 4.12 Diagram of the eye.
Anatomy
The eyes lie partially protected in bony cavities of the skull. They are guarded by the eyelids (upper and lower) which have the faculty of blinking and closure. The white part of the eye is the sclera and the clear transparent central part is the cornea.
The cornea covers the coloured iris which controls the size of the pupil. Behind the pupil, which appears black in colour, is the lens which is not normally visible. The retina is the inner lining of the eyeball and it provides the sight receptors. The conjunctiva is the outer lining, a thin membrane which covers both the inner surfaces of the upper and lower eyelids, and the visible part of the eyeball except for the cornea (Figure 4.12).
Examination
The first stage in treating an eye injury is to record a full account of the injury, what happened and the details of the symptoms. It will then be necessary to carry out a careful examination. It helps if the casualty is lying down, with head supported and held slightly back, during the examination.
Basic requirements are:
- Good illumination (overhead light, lamp, or hand held torch or strong day light);
- Magnifying glass;
- Soft paper tissues;
- Moist cotton wool swabs or moist cotton buds;
- Fluorescein drops (stain);
- Anaesthetic eye drops;
- Basic antibiotic eye ointment. NOTE: any opened tube should only be used for treating one patient for one course of treatment.
First record the general appearance of the tissues around the eye(s), looking for swelling, bruising or obvious abnormality; and then examine the affected eye(s) starting with the sclera, the conjunctiva, which covers both the sclera and the backs of the eyelids, and the cornea. Comparing one eye with the other is helpful and a diagram is the best method of recording the findings.
The sclera can be viewed by gently holding apart the eyelids with the fingers and asking the patient to look in four different directions. Make sure you can see well into each 'corner' of the eyelids. The inside of the lower lid can be inspected by gently pulling down the lower lid with the eyes looking upwards. The upper lid must be rolled back (everted) before the underlying conjunctiva can be inspected. There are two methods of doing this. Both require the casualty to keep looking down towards the feet while the technique is being completed.
To evert the upper lid, ask the casualty to remain looking downwards then place the index finger of one hand across the upper lid while grasping the eyelashes firmly but gently between the index finger and thumb of the other hand. Pull gently downwards on the eyelashes and then with a downward pressure of the index finger fold the eyelid back over it. The index finger is then withdrawn and the everted lid can be held back by pressing the eyelashes against the bony margin of the socket, under the eyebrow. The underneath surface of the lid can now be examined. The eyelid will return to normal position if the casualty looks upwards and then closes the eyelids together (Figure 4.13 – Method I).
The alternative methods use a cotton bud laid on or across the upper lid, instead of a finger. The same procedure is followed, with the casualty looking downward and the eyelid being folded upwards over the cotton bud, which is then withdrawn. These procedures ensure that the whole area of conjunctiva is inspected for damage or foreign bodies (Figure 4.13).
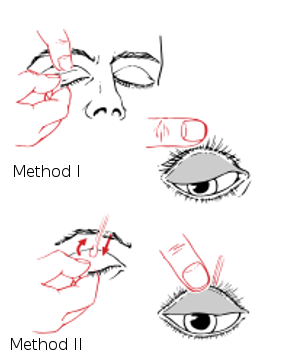
Figure 4.13 Eversion of upper eyelid – two methods.
The cornea and surrounding area should next be inspected and it helps to slant the light across the surface to show up any abnormality. The magnifying glass is beneficial for this examination. The cornea should be clear and any area of cloudiness or opacity, or the presence of foreign bodies should be noted. The surrounding sclera may be reddish in colour which can signify corneal irritation. Any obvious loose foreign body should be removed at this stage (see below).
Staining the eye with fluorescein will highlight any area of corneal or conjunctival damage. The fluorescein drops should be instilled with the lower lid everted with the casualty looking upwards. Wipe any excess dye off the eyelids. Any area of corneal or conjunctival damage will attract the dye and be stained green. Any such area should be clearly shown on the diagram in the casualty's notes.
The more common injuries affecting the eyes and the treatments are described in the following paragraphs. Treatment for the relief of pain should be appropriate to the degree of discomfort being experienced.

Blows on or adjacent to the eye (black eye)
These blows may result either in the complete or partial detachment of the retina or in bleeding into the eyeball. If, after an injury, there is any marked deterioration in sight the casualty should be put to bed and seen by a doctor as soon as possible. Get RADIO MEDICAL ADVICE. Even if there is no discernible deterioration of sight the casualty should be advised to visit a doctor at the next port.
Corneal abrasions
A scratch or abrasion on the cornea can be caused, for example, by a foreign body under the eyelids or by a fingernail touching the eye. Pain is felt immediately and the casualty thinks there is some-thing in the eye. Corneal abrasions can be identified by staining the eye with fluorescein. Antibiotic eye ointment should be placed along the inside of the lower lid, and blinking the eyelids will smear the ointment across the eye. An eye pad held in place by loose strapping should be applied for 24 hours. Next day re-examine the eye, using the fluorescein stain. If there is no sign of staining after careful examination, the treatment can be stopped. If the cornea still stains, repeat the treatment every 24 hours until the staining ceases or the casualty visits a doctor.
Loose foreign bodies
These can often be removed from under the lids or over the conjunctiva without the use of anaesthetic eye drops. Use moistened cotton wool on a stick or a moistened cotton bud. Be very gentle. After you have removed the foreign body or foreign bodies, stain the eye with fluorescein and mark any areas of staining on an eye diagram. If there is any staining, treat as for corneal abrasion.
However, the eyes of some persons are so sensitive that it is impossible to examine the eye thoroughly or remove a foreign body unless anaesthetic eye drops have been used. These drops may cause slight smarting for several minutes after being put into the eye. Wait for this effect to wear off before examining the eye or attempting to remove a foreign body by the method described above. Remember that the surface of the eye will be insensitive so you must be very gentle. After the foreign body has been removed treat as for corneal abrasion.
A foreign body may occasionally adhere to the surface of the eye and an attempt to pick it up using a cotton bud will fail. The anaesthetic eye drops should then be used before one attempt is made to remove the foreign body using a nylon eye loop. The greatest care must be taken not to injure the eye and should the attempt fail it must not be repeated. Afterwards, whether successful or not, treat as for corneal abrasion.
Foreign bodies embedded in, or completely inside, the eye
When very small pieces of metal, grit etc. become embedded in the cornea or the sclera, it may be very difficult to see either the wound or the object, even with the help of fluorescein, and the patient may not have felt any pain when the accident occurred. However, you should suspect such an accident if questioning the patient reveals that he has been hammering, chipping, milling, boring or striking metal with a tool, or standing near someone who was doing so, or has rubbed his eyes after getting dirt in them.
If you believe an injury of this kind has occurred, or you are in any doubt about it, treat the eye as for corneal abrasion. However, the application of antibiotic eye ointment should be repeated often enough to keep the eye comfortable but not less frequently than every six hours. The casualty should see an eye specialist as soon as possible. Do not attempt to remove the foreign body yourself.
Wounds of the eyelids and eyeball
Get RADIO MEDICAL ADVICE AT ONCE, if the eyeball is cut and if the eye leaks fluid or jelly. In the meanwhile close the eyelids or approximate them as best you can. Cover the eyelid with one or two layers of paraffin gauze to keep the eyelid shut. Then place an eye pad over this. Stick the eye pad in place with strips of adhesive tape or sticking plaster. Give the standard antibiotic treatment.
Chemical burns
If this has not already been done, wash the chemical out of the eye with copious amounts of water for as long as is necessary to ensure that no chemical remains in the eye. This period is rarely less than 10 minutes.
Then stain the eye with fluorescein. If there is marked staining of the eye, antibiotic eye ointment should be applied copiously to prevent the lids sticking to the eyeball. Apply the ointment every 4 hours, and cover the eye with paraffin gauze and an eye pad. The casualty should be seen by a doctor as soon as possible.
Less severe damage should be treated by 4–hourly applications of antibiotic eye ointment with an eye cover of paraffin gauze and a pad. Re-examine the eye each day, using fluorescein. Treatment should be continued for 24 hours after the eye is not stained by fluorescein and is white.
Arc eyes ('Welder's Flash')
The ultra-violet (UV) in an electric arc can cause 'sunburn' of the surface of unprotected eyes. In arc eyes, both eyes feel gritty within 24 hours and look red. Bright light hurts the eyes. The eyes should be carefully searched for foreign bodies and be stained with fluorescein. If one eye only is affected it is probably not an arc eye. It may be due to an embedded corneal foreign body or an area of corneal damage which will show on staining with fluorescein.
Bathing the eyes with cold water and cold compresses applied to the lids will give some relief of symptoms. Dark glasses help the discomfort caused by light. If the eyes feel very gritty, apply antibiotic ointment to the eyes every 4 hours. The condition will usually clear up spontaneously within about 48 hours if no further exposure to UV occurs. Further exposure to welding should be avoided and dark glasses should be worn in bright sunlight until the eyes are fully recovered.

Ear injuries
Foreign bodies
Sand, an insect, or some other small object in the ear may cause irritation, discomfort or pain. If it is clearly visible, it may be possible to remove it using tweezers. If this cannot be achieved easily NO other efforts should be made to extract it by any means. You may pierce the ear drum if you try to remove objects which are not visible or which are stuck in the ear passage; also you might push the object further in.
If nothing is visible, flood the ear passage with tepid groundnut (arachis), olive or sunflower oil which may float the object out or bring it out when the casualty drains his ear by lying over on the affected side. If these measures are unsuccessful send the casualty to a doctor at the first available opportunity.
Injuries to the internal ear
If the ear drum has been perforated as the result of a skull fracture there may be a flow of cerebro-spinal fluid and this should not be stopped by inserting anything into the ear. The casualty should be placed on his injured side, with his shoulders and head propped up; this will allow the fluid to drain freely. For other injuries, put a dressing over the ear and apply a bandage. Do not put cotton wool in the ear passage. In all cases, get RADIO MEDICAL ADVICE.
Nose injuries
Foreign bodies
Sometimes, when a foreign body is stuck in one nostril, the casualty can blow it out by compressing the other nostril and blowing down the blocked one. Otherwise, if the object can be seen and is loose it may be removed by using forceps. Unless this is clearly feasible no attempt should be made to remove the object and the casualty must be seen by a doctor.
Injuries inside the Nose
If bleeding cannot be controlled by the method described in Chapter 1 then it may be necessary to pack the nose. This is done by lubricating ribbon gauze thoroughly with petroleum jelly (Vaseline) and inserting it in the nostril with the aid of forceps (Figure 4.14). Put in sufficient gauze to fill the nostril without stretching it unduly. Leave the gauze in place for 48 hours, and then gently pull it out.

Nasal pack layered into cavity.
NOTE: floor of nose is horizontal. Do not pack
Figure 4.14
A fracture of the nose cannot be dealt with on board ship and the only problem will be to stop any persistent bleeding. Any distortion of the nose will have to be corrected in hospital.

Mouth and dental injuries
Cuts inside the mouth and a broken jaw
When there has been a severe blow to a jaw, especially if the jaw is broken, there may be complications caused by broken dentures, by the loss of teeth and by wounds to gums, the lips, the tongue and the inside and outside of the mouth. For external wounds to the cheek and lips treatment is as for any skin wound.
For wounds inside the mouth the casualty should first rinse his mouth well with antiseptic mouthwash which should remove any loose fragments. You should not try to extract pieces of tooth from the gum. If the casualty is in pain read the section on analgesics.
Treatment for a lost tooth is given in Chapter ship captains medical guide first aid
No attempt should be made to stitch deep wounds of the cheek and tongue. Serious bleeding should be controlled by pressure.
If a jaw is or may be broken the upper and lower jaws should be held together by a bandage with, as far as possible, the upper and lower teeth fitting together as they normally do. If the patient has dentures which still fit adequately he should wear them; they will help to act as a splint.
If the wounds on the face or inside the mouth are other than very slight give antibiotic treatment. If the casualty is unable to take tablets by mouth give benzyl penicillin 300 mg intramuscularly every six hours for five days.
Burns and scalds
The treatment of burns and scalds caused by dry or wet heat respectively is the same.
Classification
Skin has an outer layer (epidermis) and a deep layer (dermis). The latter contains the sweat glands, hair follicles and nerves relaying sensation and pain to the skin.
FIRST DEGREE BURNS affect only the outer skin layer, causing redness, mild swelling, tenderness and pain.
SECOND DEGREE BURNS extend into the deeper skin layer (dermis):
- Superficial second degree burns cause deep reddening, blister formation, considerable swelling, and weeping of fluid.
- Deep second degree burns may not be easy to distinguish from third degree burns immediately after the injury. Pain may be severe because of damage to the nerve endings
THIRD DEGREE BURNS involve the whole thickness of skin, and may extend to the underlying fat, muscle and bone. The skin may be charred, black or dark brown, leathery or white according to the cause of the burn. Pain may be absent due to destruction of the nerve endings.
Fluid loss
The fluid lost in burns is the colourless liquid part of the blood (plasma). The degree of fluid loss may be determined more by the area of the burn than by its depth. The greater the plasma loss, the more severe the degree of shock. Further, due to loss of plasma, the remaining blood is 'thicker', and more difficult to pump round the body, throwing extra strain on the heart.
Area of burn – the rule of nines
A recognised method of calculating the surface area of the body is the 'rule of nines' (Figure 4.15). In children (not babies) the percentage for the head should be doubled and 1% taken off the other areas.
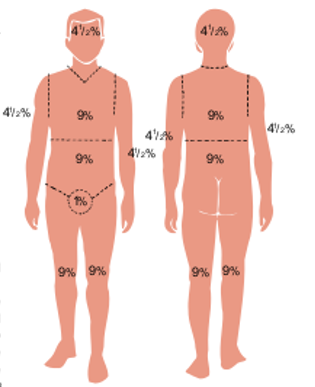
Figure 4.15 Rule of nines – to determine the extent of burns.
Treatment
Try to remove to hospital within 6 hours or otherwise seek RADIO MEDICAL ADVICE in the case of:
- third degree burns, especially those which encircle chest or limbs;
- babies;
- burns of face and genitalia, and large burns around joints;
- burns of over 18% of the body surface in adults or 10% in children or older persons (Figure 4.15).
Until removed to hospital put the patient to bed and seek to restore the fluid balance by encouraging the patient to drink as much as possible. Put rehydration powder into the drink according to the instructions; (if not available dissolve 1 teaspoonful of salt in 1/2 litre of water). If vomiting occurs and persists, fluid per rectum may be necessary. Relieve pain and start antibiotic treatment. Remove rings, jewelry or constricting items of clothing. Anxiety may be relieved by giving diazepam 5 mg, repeated every 4 hours. Cling film makes a good temporary dressing for large burns.
Less serious cases can be treated aboard ship.
First assemble:- a plentiful supply of soap, warm boiled water and gauze pads;
- at least two sets of sterile scissors and forceps; sufficient paraffin gauze burn and wound dressing to cover and overlap the cleansed burned areas;
- sterile gauze and sterile cotton wool to go on top of the dressings as padding;
- suitable sterile bandages;
- face mask for each attendant
Wash your hands and forearms thoroughly and put on a face mask. Remove the first-aid dressing to expose either a single burned area (in multiple burns) or a portion of a single burn e.g. a hand and forearm, or a quarter of the back. The aim is to limit the areas of burned skin exposed at any one time to lessen both the risk of infection and the seepage of fluid. Clean the skin around the edges of the burn with soap, water and pads. Clean away from the burn in every direction. DO NOT use cotton wool or other linty material for cleaning as it is likely to leave bits in the burn.
Leave blisters intact but clip off all the dead skin if blisters have burst. Flood the area with clean warm boiled water from a clean receptacle to remove debris. Soak a pad in warm boiled water to dab gently at any remaining dirt or foreign matter in the burned area. Be gentle as this will inevitably cause pain.
Next cover the burn with the paraffin gauze dressing, overlapping the burn or scald by 50–100 mm, according to its size. To absorb any fluid leaking from the burn apply a covering of absorbent material, e.g. a layer of sterile gauze, covered with a layer of sterile cotton wool. This is held in place by a suitable bandage.
Thoroughly wash your hands and arms before proceeding to deal as above with the remainder of a large burn or another burn in the case of multiple burns. In serious cases, start antibiotic treatment.
Dressings should be left undisturbed for a week unless the dressing becomes smelly or very dirty, or the temperature is raised. Re-dress such areas as above. Supercicial second degree burns will usually heal in a week to ten days without scarring. Deeper second degree should heal with little scarring in about three weeks.

Special burns
Severe sunburn with blistering should be treated as a second degree burn according to the area of the body involved. In mild cases, (first degree burns) keep the patient out of the sun and apply calamine lotion or zinc ointment to the painful areas.
Scalds and burns of mouth and throat.Wash out with water and give ice to suck. Respiratory burns are caused by the inhalation of hot gases and air particles, and smoke. Expect such a burn when you find burns around the mouth, nose, face, hair and neck. Heat from a flash fire may also cause a burn-related swelling of the top of the throat, even though there is no sign of burns on the face.
A patient with a mild injury to the respiratory passage may have only a cough, hoarseness, or a sore throat. In more severe cases the patient may suffer from marked shortness of breath, persistent coughing, wheezing and hoarseness. In very severe cases the respiratory passages may be blocked by a swollen throat and the lungs may partially collapse.
If the patient has difficulty in breathing and is unconscious insert a Guedel airway. In any event, get RADIO MEDICAL ADVICE IMMEDIATELY.
Dislocations
The commonest dislocations are of the shoulder and the finger joints. Try to deal with (i.e. reduce) these dislocations if a doctor cannot see the casualty within about six hours. All other dislocations should be left for treatment by a doctor. Until this is possible, place the patient in a comfortable position and relieve pain.
NOTE: In some cases a dislocation may be accompanied by a fracture of the same or a related part, so be careful.
Dislocated shoulder
The shoulder will be painful and cannot be moved by the patient. Undress the patient to the waist and note the outline of the good shoulder and compare it with the affected side. Usually in a shoulder dislocation the outward curve of the muscle just below the shoulder is replaced by an inward dent, and the distance from the tip of the shoulder to the elbow is longer on the injured side. This is because the head of the arm-bone usually dislocates inwards and downwards. If you think that the shoulder is dislocated, give the casualty 15 mg of morphine intramuscularly. When the pain is relieved (in about 15 to 20 minutes), the casualty should lie face downwards on a bunk, couch or table, the height of which should be sufficient for the arm to hang down without touching the deck. As the casualty lies down on the bed, hold his dislocated arm until you have placed a small pillow or big pad under the affected shoulder. Then lower the arm slowly until it is hanging straight down the side of the bunk and leave it to hang freely. The patient should remain in this position for about 1 hour, letting the weight of the arm overcome the muscle spasm caused by the dislocation. At the end of this period, if the dislocation is reduced, the patient should roll onto his good side and then use the injured arm by bending the elbow and then touching the good shoulder with the fingers. Afterwards he should be helped to sit up and the arm should be kept in a collar and cuff sling until the shoulder is fairly comfortable. This might take up to 48 hours. When the sling is removed, the patient should exercise the joint slowly and carefully. A check x-ray should be taken at the next port. If the above treatment does not reduce the dislocation, get RADIO MEDICAL ADVICE.
Dislocated finger
Finger dislocations can usually be reduced by pulling firmly on the finger. It is often a good idea to begin by binding the patient's elbow to a right-angle. Pull firmly on the finger for about one minute while a helper is pulling in the opposite direction at the elbow. Keeping the ends of the bones apart by pulling, gently ease the joint back into its normal position. The affected finger should be immobilised by strapping to an adjacent finger. After 24 hours, the strapping should be removed and the patient should exercise the finger slowly and carefully. A check x-ray should be taken at the next port.
Sprains and strains
These injuries are usually the result of twisting, turning or tripping. Pain is usually felt at once, and later swelling at the site of injury will occur due to bleeding.
There is no sure clinical method of excluding fracture associated with sprains and strains except by x-ray. When there is doubt, it is therefore safer to assume the possibility of fracture and to treat accordingly.
Whether the injury is seen immediately or later when much swelling may have occurred, put the casualty in his bunk and elevate the injured part, if this is possible. Cold water compresses kept in place by a crepe bandage should be applied. An ice-pack wrapped in a damp cloth may also help to reduce swelling. Avoid prolonged use of ice as skin damage can occur.
Rest and elevation may be necessary for two to three days (or sometimes longer according to the severity of the injury). Continue support with a crepe bandage. Pain relief may be necessary.
If an associated fracture is not present, gentle movement of the injured part should be encouraged. Sprains and strains do much better with early movement than with too long a period of rest. The casualty can usually judge when he can use the injured part for full or restricted duties.
If not fully recovered, get an x-ray at the first port of call.